Proa Rig Options: Gibbons Rig
GALLERY | Click images to enlarge
The story of this rig begins in Hawaii, with Euell - “Have you ever eaten a pine tree?” - Gibbons, a half century ago. Now, thanks to a renewed interest in proas and the easy flow of information on the Internet, the rig has received some new attention, and looks to become a very good proa rig indeed.
 Writer and naturalist Euell Gibbons was living in Hawaii and dining on the jungle flora and fauna in the 1950’s. He soon realized that "an island is a small body of land surrounded by the need for a boat", so he set out to build himself one. Euell had been a professional boatbuilder, so he knew something of what he was about.
 Being deep in Polynesia, Euell was naturally drawn to the native outrigger canoe. He had a good knowledge of the type, and spent a considerable amount of time studying museum models and local examples. Euell built a proa, patterned more on the classic Micronesian design than a Hawaiian canoe. He departed from tradition in some ways, first by building the canoe out of plywood (a very modern, high-tech material in those days) and then by taking liberties with the classic Oceanic rig. Euell wrote:
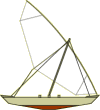
My sail was made of parachute cloth, all re-cut and re-sewn. It was triangular in shape, with a long, light bamboo spar permanently fastened along one edge of the sail. On a lateen rig this spar is called a yard, as it is on a squaresail. A stout bamboo mast was stepped in the very center of the main hull, right on the sidewise axis of symmetry , and stayed in place with clothesline wire and turnbuckles.
The sail was hoisted up the mast by a halyard attached to the exact middle of the yard. The end of the yard that would be the forward end on the first tack was pulled down and fastened to what would be the forward deck on that tack, making the yard rise diagonally up and aft, the after end projecting behind and above the top of the comparatively short mast. The sheet, the line with which the sail is handled, was fastened to the corner of the triangle opposite the yard, and led through a block on the afterdeck. All fittings at one end of the boat were duplicated at the other end.
On a beat to windward I planned to let the temporary bow of the boat fall off the wind in the direction opposite the outrigger until the sail filled. Then I planned to trim the sail with the sheet until it was pulling its best and the boat began moving through the water at that dazzling outrigger speed that always surprises sailors of conventional craft. It was a safe rig, for whenever the outrigger left the water and the boat threatened to capsize, all I had to do was to let the sheet run and spill some wind from the sail, let the outrigger drop back into the water, and re-trim the sail to make her go her best, which was exceedingly good.~The Beachcomber Afloat
Gary Dierking

This would most likely have been the last ever heard about Euell’s proa design, were it not for Gary Dierking. Gary happened upon his battered, twenty year old copy of The Beachcomber Afloat when he was cleaning out the attic last year.
Gary had been building and designing outrigger canoes for years, and had just completed Tarawa, his 16’ strip-planked proa. Gary thought that the rig described by Gibbons had some merit, and after some discussion over the Internet with other proanauts, he soon built a modified version out of bamboo and polytarp.
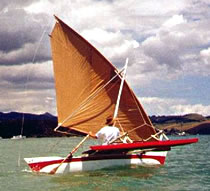
Gary’s rig was a bit different than Euell’s. Instead of mounting the yard on a fixed, vertical mast, he employed a canting, Micronesian style mast. This allowed the sail’s CE to shift forward during a shunt, and to echo the position of the crab claw. Now the rig would balance with the Center of Lateral Resistance of the hull, for straight tracking and easy steering. Gary also added a sprit boom, and sheeted to that. The boom allowed the rig to be set up and tensioned much like a windsurfer rig, with considerable bend in the yard. Gary’s report after his first sail:
After a couple of days of hard work the next generation Gibbons rig has had its first flight. It combines Euell Gibbons’ method of tilting the yard end to end with windsurfer sail technology. All I can think to say right now is "WOW"! There are still small annoying glitches to work out but I will definitely be devoting most of my efforts to developing this rig.
I’ve been sailing the last few weeks with a classic oceanic lateen rig to establish a performance benchmark. The new sail is roughly the same area but with a higher center of effort. The evening was pleasant with a 5-10 knot wind. As I pushed off the beach into the wind the difference was apparent immediately. It felt like I had almost double the power I had before. I suspect it’s the kind of power that John experienced with the AYRS/Bolger rig.The good news is that it’s controllable. The higher center of effort and increased thrust depresses the bow a bit and I found myself sitting farther aft than with the old rig. There’s plenty of reserve buoyancy with the hull though and it’s not a problem. It seemed that I was closely matching windspeed on all but close-hauled courses. The ama flew for a few seconds now and then but it seems to be a non event - easily controllable. The canoe has a lot of power now and I’m sure I’ll end up in the water eventually, but it’ll be worth it.
Since the first sail, Gary’s enthusiasm for the Gibbons rig has only grown. It keeps the basic configuration of the Oceanic rig, so the boat balances and steers as well as a traditional canoe. However, the rig is more efficient to windward, and obviously very powerful. It’s other advantage over the traditional crab claw is how easy it is to shunt:
- Release mainsheet. As the boat glides to a halt…
- Release the tip of the yard from the bow by uncleating the endless line that controls the tilt of the yard.
- Then haul on the line until the other end of the yard reaches the new bow (Halfway through the maneuver it looks as though there is a small hang glider tethered to the mast head).
- Sheet in and go!

Shunting the Gibbons Rig
Note that the sailor need not go to the ends of the canoe to shunt, as is the case with the traditional rig, and does not guide the heel of the yard from one end of the canoe to the other.
The Gibbons rig probably THE rig for small proas. Once fully developed, it should be at least as efficient as a windsurfer sail, which is currently the best single-surface sail in the world. It has an advantage over the windsurfer however, in that it need not reverse its sail curvature for each tack. This may mean that the sail could be even better than the windsurfer, and more wing-like.
Why only small proas? Because currently, the Gibbons rig is not reef-able. Like a modern windsurfer rig, it is a tightly tensioned membrane, and does not quickly reef or furl. Until reefing (or some other way of reducing power) is figured out, the rig is suitable only for protected waters, and small boats.
Rigging Details
Below is Gary’s account of how he built the sail and spars.
The Yard
 To make the 6 meter yard I joined two 3 meter sections of 50mm (2") bamboo with a dowel in the center and then wrapped it with fiberglass tape and epoxy. I also glued in smaller dowels at the small ends.
The Luff Curve: A 3 meter piece of timber was used as a temporary boom and one end was lashed to the midpoint of the yard. I tied a piece of line to one end of the yard, then led it through a hole in the outer end of the boom and then to the other end of the yard. I then pulled one end of the line to bend the yard to the amount of curve that I thought reasonable. This is very much like setting up a windsurfer rig although bamboo isn’t as stiff as a windsurfer mast. I then traced the outline onto the floor with a pencil. I added some roach area where there will be a small batten at each end. The hardest decision is determining the amount of luff curve. I used the time honored method of "that looks about right". I bulged the luff curve out another 4" (100mm) at the midpoint and tapered it to the ends.
The Sail
For fabric I’ve got the heavier grade of polytarp in a tan color. It comes in a 6’ (1.8 meter) width roll so it requires very few seams. I oriented the fibers (warp) along the two leaches with a miter seam along the boom line. When the sail is tensioned, the leaches will be under the greatest stress. I cut the panels to the shape drawn on the floor and glued the seams with contact cement (Weldwood or Ados). The luff has a sock to hold the spar, also glued on. The three corners of the sail get extra layers and there are two batten pockets. Then my faithful assistant ran all the seams through the sewing machine. The gluing is really just to hold everything exactly right while it’s being sewn.
The Boom
The actual boom needs to be a smooth tube so I used aluminum for that. The boom is permanently fixed to the top of the mast with a gooseneck or in my case with polyester lashings. The boom is just slightly shorter than the mast so it can clear everything at deck level. I wrapped a 1 ft section of the boom with waxed paper and then wrapped that with many layers of fiberglass. This produced a sliding collar to which the midpoint of the yard will be lashed. To set the sail, the clew is permanently lashed to the bottom of the hanging boom. The halyard is attached to the sliding collar and when the yard is hoisted it tensions the sail. The "outhaul tension" is controlled with halyard tension. The greater the halyard tension, the flatter the sail.
Gary Dierking’s website: Outrigger Sailing Canoes
Originally published 2001. We are re-publishing some archived articles in order to present them to newer readers.


Regarding reefing, is there a reason a simple furler couldn’t be used? The sail isn’t too dissimilar to a jib, though i guess you’d have to call the edge along the ‘boom’ the ‘luff’ instead of the ‘foot’. Being symmetrical, I imagine that the shape would be very effective partially furled (rather than being lashed along to boom, the furling drum would be one end of the boom, with a furling foil stretched along its length and attached at the other end. Sorry if that was long winded for what should have been a simple explanation!