Testing with models - part 2
From the Proafile Archives. Originally posted 1999
After my exciting but ultimately unsatisfying flirtation with anti-heeling Bruce foils for my proa scale model, I went out and bought my first computer. We all know what a huge time sink that is, so the proa and any model testing pertaining to it went onto a very remote back burner. This turned out to be perfect timing, since once I discovered the internet, I gradually found other people who were also interested in proa design and development. (All three of us!)
Actually, the one person most instrumental in helping me with my proa learning curve, John Dalziel, I met the old fashioned way: through a letter. He had written a letter to the editor of Multihulls Magazine about his experiences with his Caroline islands proa replica, and it prompted me to write him back, basically asking for help with Rozinante. John was very interested in my proa project, and gave very generously of his time to help me work up idea after idea, until we finally got to a workable plan. John was the only one I knew at the time who had experience with both the Oceanic sprit and the Bolger rig. (He had been seduced by the hope of high aerodynamic efficiency and easy shunting that the Bolger rig promised, only to come up against many of the same handling problems that I had.)
John came at the proa from much more of an anthropological point of view than I was used to. He was fascinated with the proa as a highly refined cultural artifact as well as an interesting naval architecture challenge. John had a breadth of knowledge about the various traditional proa types that was totally new to me. His enthusiasm for the traditional Micronesian sailing canoe was contagious, and I soon found myself fitting an Oceanic sprit rig on my sailing test model.
The Oceanic Sprit
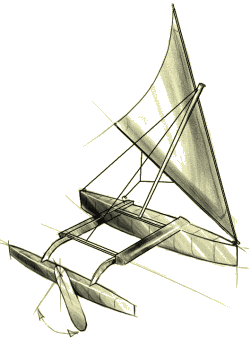
The first Oceanic sprit, or "crab-claw" rig I tested was very basic. I cut an equilateral triangle of 300 sq. in. with pockets on the luff and foot for both the yard and boom. Both spars were the same length, and I hoisted the yard on a traditional forward canted mast. For leeway resistance, I put a pivoting leeboard on the ama, so the CLR could be adjusted to create a steering moment.
I carried the model to the pond, and let her go as soon as a small breeze found us. The model sailed away, finding its course immediately, and stayed there. The self-steering of this model was very good. It responded quickly to changing wind speeds and directions, and was rarely caught off-guard. The most exciting thing to me, however, was that the model exhibited no bow-down sailing attitude whatsoever. This bow down pitch had been apparent through all the variations of the previous schooner rigged model, and in fact I was beginning to wonder if it was an unavoidable side-affect of the proa geometry. What I later learned was that unlike almost all Western rigs, the Oceanic sprit is a lifting rig. What this means is that its aerodynamic force is aimed slightly upwards, creating lift. This upward force relieves the downward pressure on the bow that comes with the schooner’s sails, and solves the problem at its source. The ability of this simple sail to bring my boat back onto its proper sailing lines was a revelation to me. I suddenly understood that the sail and the hull of the traditional proa are linked together. I had been trying to fit a Western rig to Rozinante, because it was familiar to both me and the sail maker, the rigger, and the hardware maker. I must admit that I was tired of blazing new rigging trails after the failure of the Bolger-rig. I thought: "shunting is hard enough, why complicate things with an unfamiliar south seas rig?"
My refusal to consider the traditional rig was what was holding me back. After John Dalziel opened my mind enough for me to try one on my model, I discovered that it was the sail that my proa had been wanting all along. I felt like I had just tried green eggs and ham for the first time!
The Oceanic sprit has a very low center of effort, lower even than the twin sails of my previous schooner rig. This suits the low righting moment of the proa just fine, of course. My model exhibited better stability than with the schooner rig, but it was still tender compared to the amazing Bruce foiler. I decided to add some ballast to the outrigger to improve the righting moment. Adding ballast to a proa is quit simple compared to a tacking sailboat. You put it out to weather as far as you can, and leave it there. No shifting it from side to side for each tack. Water ballast is the obvious choice, since you can be rid of it most of the time, and then pump aboard the water ballast equivalent of as many heavy crewmen as you need to keep the boat on its feet.
Oceanic Sprit w/ Leeward Pod
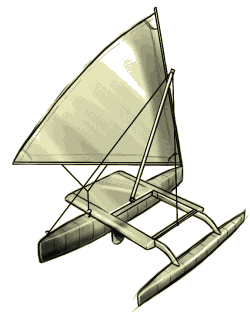
I also added a buoyant leeward counterpoise, or "pod", to the model, since the full-sized Rozinante has such a feature. The pod gains usable interior volume, and hopefully, adds righting moment in case of extreme angles of heel.
The latest model sailed very well. Fast and smooth in light air, and if the wind was stronger , I added the ballast. The ballast did the trick, and kept the boat upright into much higher wind speeds. It was fun to watch the boat sail near its limits of stability, since it would sail for considerable distances while flying the outrigger log clear of the water’s surface. If a gust happened at that moment, then the boat would heel to over 45 degrees, and the buoyant leeward pod would submerge. The boat would slow, and then either turn into the wind and right itself, or it would stay balanced at that extreme angle of heel until the gust was past, and then it would right itself and sail on. The model seemed to exhibit near monohull stability characteristics. (Very strong and sudden wind gusts could still overwhelm the model, and it WOULD capsize. This model did show better gust management than any of the previous versions, however.)
One change that needed to be made, was the position of the leeboard out on the outrigger log. If the log was flying, then the leeboard was spending a good percentage of time out of the water, hardly the best place for leeway resistance. I moved the board to the leeward side of the main hull, underneath the lee platform. Now the board was always immersed no matter how high the log flew.
My model now sailed about as well as I had a right to expect it to. It sailed level in pitch, with no bow down attitude, and no tendency at all to pitchpole. Compared to the Atlantic proa or the Bruce foiler, it was the fastest configuration in light to medium air, which is what I wanted for the generally light conditions of Puget Sound. The addition of water ballast augmented stability for heavy air, and the model seemed to have excellent stability characteristics for a multihull, being more forgiving of large angles of heel than any catamaran or trimaran could be. It was self-steering on most courses, from a broad reach to a beat. And last but not least, it didn’t seem to harbor any bad vices, unlike the Atlantic proa or the Bruce foiled proas. It didn’t suddenly catch a foil or an ama, or often get caught aback, and it never pitchpoled. The best thing was that the required modifications to Rozinante were relatively minor, compared to the major surgery needed to convert her to an Atlantic proa or a foiler.
There was only one thing about the latest model that I didn’t like, and that was the difficulty of shunting the Oceanic rig. The traditional rig is not so hard to handle by a crew of two or three, but from reports of others who have sailed them, single-handed it can be a handful, and I knew that I would be single-handing often.
After I decided on the basic sail plan, I then used the model to help me work out the details of the shunting procedure: where to run rigging, etc. Making it work on the model gives me greater confidence that it will all work at full scale.
Note that I didn’t make my models to exacting tolerances and then take precise measurements in a test tank. That is because I was seeking to determine the gross arrangement of the sailboat, not to determine the optimum shape or efficiency of a single part. These models were getting me into the "ballpark" of how I wanted my proa to perform. Now that I have narrowed down my basic configuration, I could devise more precise experiments to determine optimum sail planforms, hull length:beam ratios, outrigger shapes, leeboard planforms and sections, or any number of parameters that would be interesting.


